Solution-Shell 工具和脚本
- 阅读 man ls ,然后使用 ls 命令进行如下操作:
- 所有文件(包括隐藏文件):
-a - 文件打印以人类可以理解的格式输出 (例如,使用 454M 而不是 454279954):
-h - 文件以最近访问顺序排序:
-t - 以彩色文本显示输出结果
--color=auto
典型输出如下:-rw-r--r-- 1 user group 1.1M Jan 14 09:53 baz drwxr-xr-x 5 user group 160 Jan 14 09:53 . -rw-r--r-- 1 user group 514 Jan 14 06:42 bar -rw-r--r-- 1 user group 106M Jan 13 12:12 foo drwx------+ 47 user group 1.5K Jan 12 18:08 ..
- 所有文件(包括隐藏文件):
- 编写两个 bash 函数 marco 和 polo 执行下面的操作。 每当你执行 marco 时,当前的工作目录应当以某种形式保存,当执行 polo 时,无论现在处在什么目录下,都应当 cd 回到当时执行 marco 的目录。 为了方便 debug,你可以把代码写在单独的文件 marco.sh 中,并通过 source marco.sh 命令,(重新)加载函数。通过 source 来加载函数,随后可以在 bash 中直接使用。
 #!/bin/bash
 marco(){
     echo "$(pwd)" > $HOME/marco_history.log
     echo "save pwd $(pwd)"
 }
 polo(){
     cd "$(cat "$HOME/marco_history.log")"
 }
或者
 #!/bin/bash
 marco() {
     export MARCO=$(pwd)
 }
 polo() {
     cd "$MARCO"
 }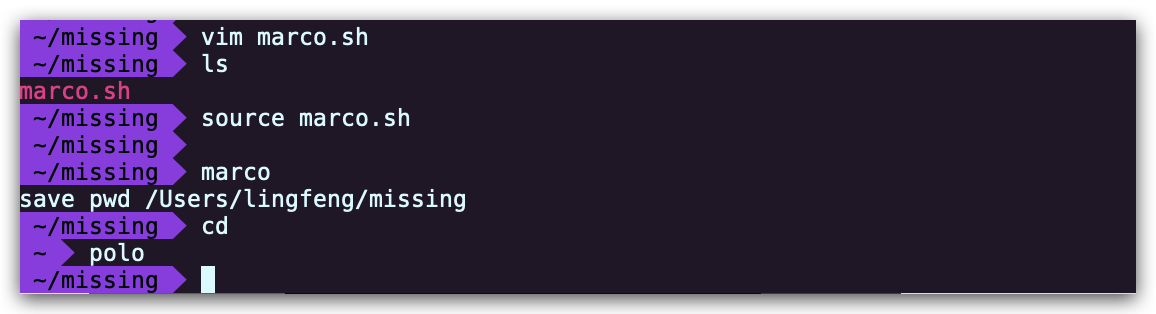
- 假设您有一个命令,它很少出错。因此为了在出错时能够对其进行调试,需要花费大量的时间重现错误并捕获输出。 编写一段 bash 脚本,运行如下的脚本直到它出错,将它的标准输出和标准错误流记录到文件,并在最后输出所有内容。 加分项:报告脚本在失败前共运行了多少次。
 #!/usr/bin/env bash

 n=$(( RANDOM % 100 ))

 if [[ n -eq 42 ]]; then
     echo "Something went wrong"
     >&2 echo "The error was using magic numbers"
     exit 1
 fi

 echo "Everything went according to plan"
使用 while 循环完成
 #!/usr/bin/env bash
 count=0
 echo > out.log

 while true
 do
     ./buggy.sh &>> out.log
     if [[ $? -ne 0 ]]; then
         cat out.log
         echo "failed after $count times"
         break
     fi
     ((count++))

 done
使用 for 循环完成
 #!/usr/bin/env bash
 echo > out.log
 for ((count=0;;count++))
 do
     ./buggy.sh &>> out.log
     if [[ $? -ne 0 ]]; then
         echo "failed after $count times"
         break

     fi
 done
使用 until 完成
 #!/usr/bin/env bash
 count=0
 ./buggy.sh &>> out.log
 until [[ "$?" -ne 0 ]];
 do
     count=$((count+1))
     ./buggy.sh &>> out.log
 done

 echo "failed after $count runs"
执行测试脚本 debug.sh, 并验证脚本结果的正确性
 ~$ ./debug.sh
 failed after 34 times
 ~$ cat out.log | grep Everything | wc -l
 34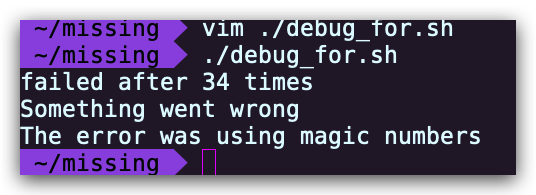
-
本节课我们讲解的 find 命令中的 -exec 参数非常强大,它可以对我们查找的文件进行操作。 如果我们要对所有文件进行操作呢?例如创建一个 zip 压缩文件?我们已经知道,命令行可以从参数或标准输入接受输入。在用管道连接命令时,我们将标准输出和标准输入连接起来,但是有些命令,例如 tar 则需要从参数接受输入。这里我们可以使用 xargs 命令,它可以使用标准输入中的内容作为参数。 例如 ls | xargs rm 会删除当前目录中的所有文件。您的任务是编写一个命令,它可以递归地查找文件夹中所有的 HTML 文件,并将它们压缩成 zip 文件。注意,即使文件名中包含空格,您的命令也应该能够正确执行(提示:查看 xargs 的参数-d)译注:MacOS 上的 xargs 没有 -d,查看这个 issue
如果您使用的是 MacOS,请注意默认的 BSD find 与 GNU coreutils 中的是不一样的。你可以为 find 添加 -print0 选项,并为 xargs 添加 -0 选项。作为 Mac 用户,您需要注意 mac 系统自带的命令行工具和 GNU 中对应的工具是有区别的;如果你想使用 GNU 版本的工具,也可以使用 brew 来安装。
- 首先创建所需的文件
  mkdir html_root
  cd html_root
  touch {1..10}.html
  mkdir html
  cd html
  touch xxxx.html
├── html_root │ ├── 1.html │ ├── 10.html │ ├── 2.html │ ├── 3.html │ ├── 4.html │ ├── 5.html │ ├── 6.html │ ├── 7.html │ ├── 8.html │ ├── 9.html │ └── html │ └── xxxx.html - 执行 find 命令
  # for MacOS
  find html_root -name "*.html" -print0 | xargs -0 tar vcf html.zip
# for Linux find . -type f -name "*.html" | xargs -d '\n' tar -cvzf html.zipa html_root/9.html a html_root/5.html a html_root/4.html a html_root/8.html a html_root/3.html a html_root/html/xxxx.html a html_root/2.html a html_root/1.html a html_root/10.html a html_root/7.html a html_root/6.html
- 首先创建所需的文件
- (进阶) 编写一个命令或脚本递归的查找文件夹中最近使用的文件。更通用的做法,你可以按照最近的使用时间列出文件吗?
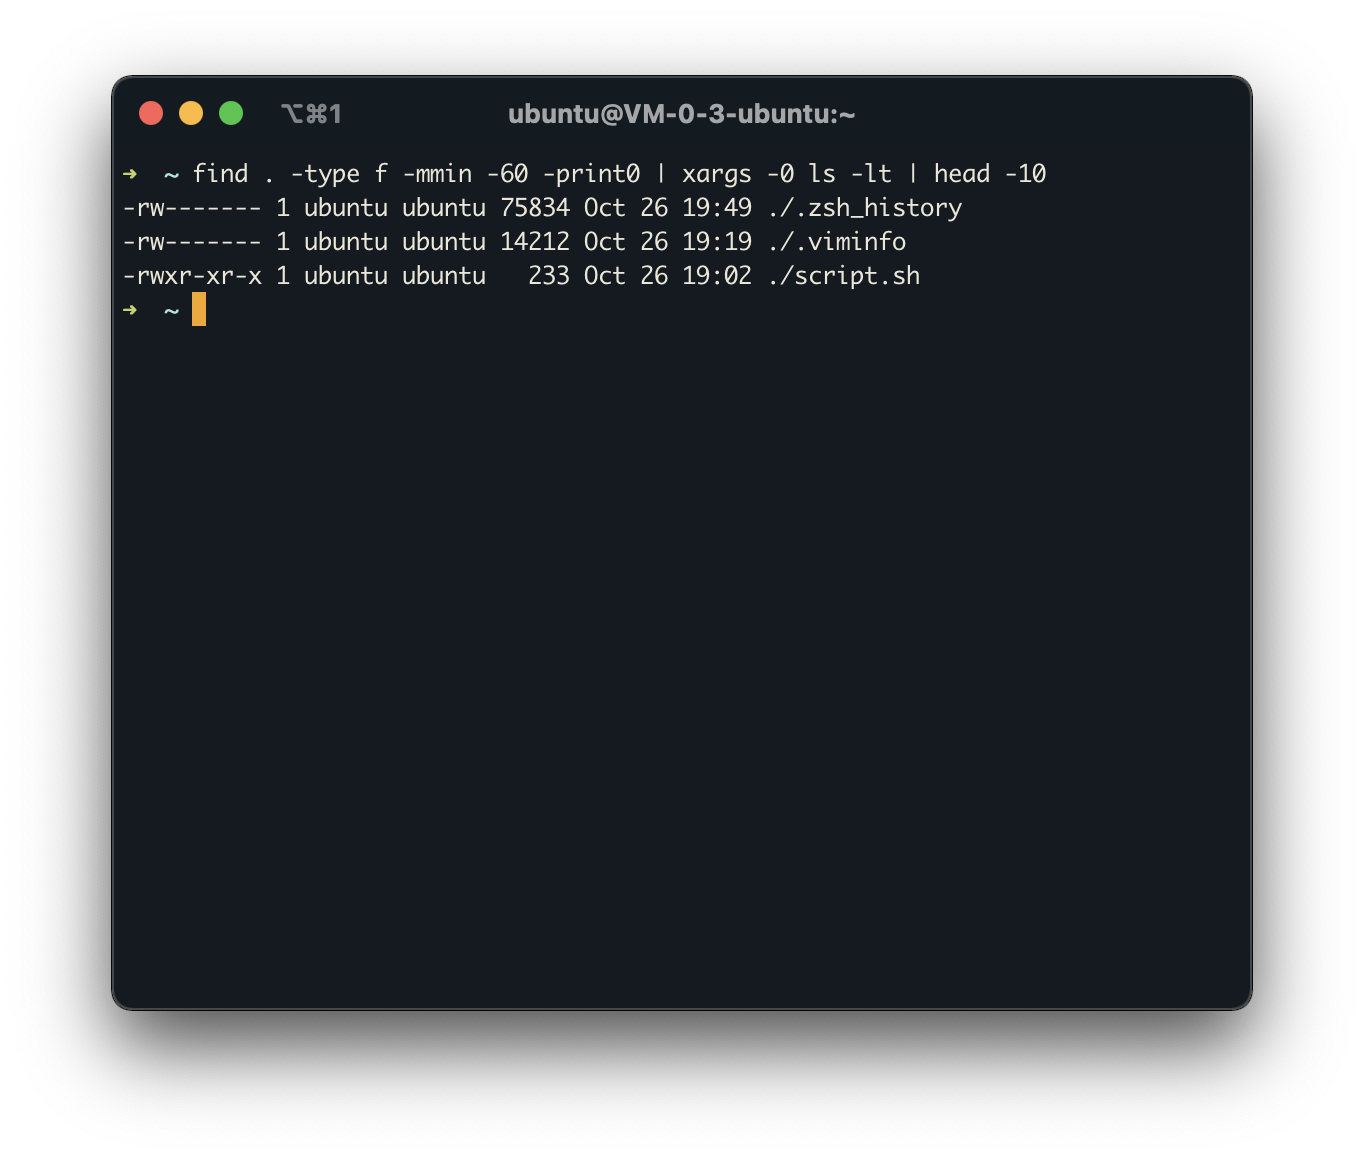
find . -type f -print0 | xargs -0 ls -lt | head -1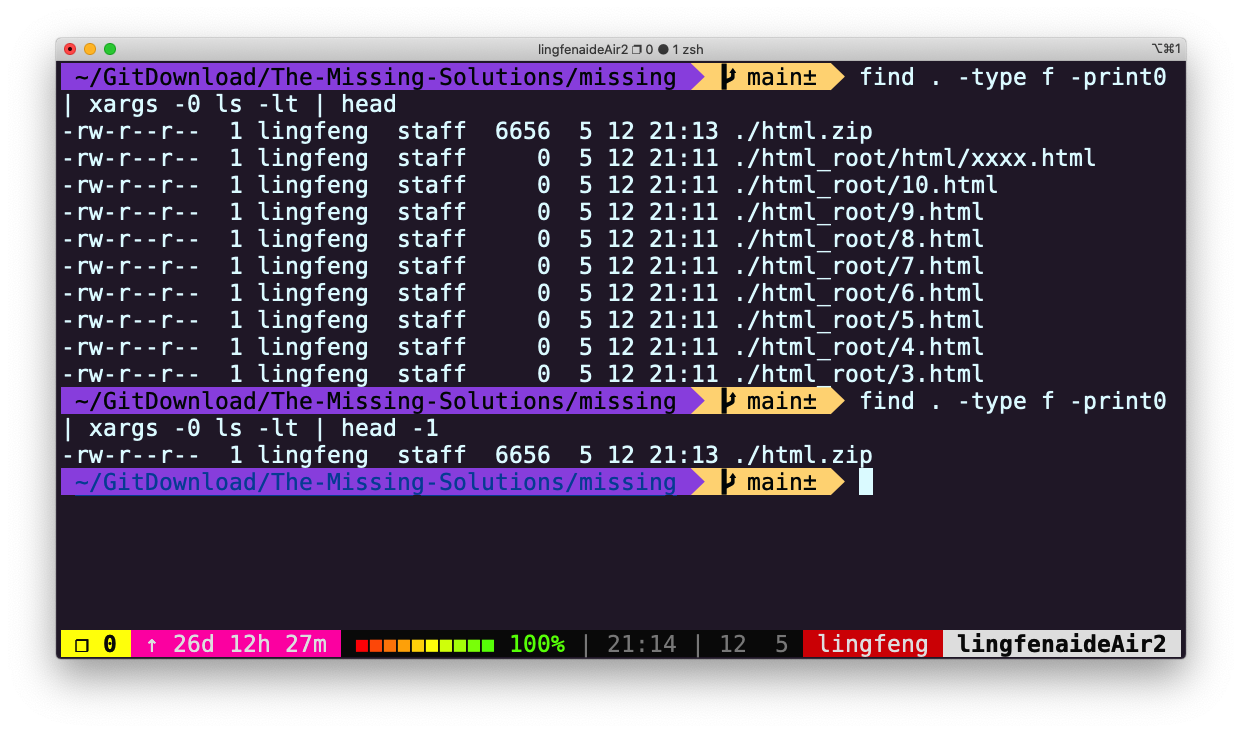
当文件数量较多时,上面的解答会得出错误结果,解决办法是增加 -mmin 条件,先将最近修改的文件进行初步筛选再交给 ls 进行排序显示
find . -type f -mmin -60 -print0 | xargs -0 ls -lt | head -10
Licensed under CC BY-NC-SA.